How-to guides
Customize roles, tiers & areas
Rename roles, tune the permissions matrix, define tiers and areas.
The /customize screen is where you bend the platform's built-in vocabulary to fit your space. From one place you can rename and recolor the five built-in roles, tune the per-space permission matrix, add display-only custom roles, define membership tiers, and set up shop areas and area leads.
Operational settings (space identity, integrations, webhooks) live under Settings (/settings), not here.
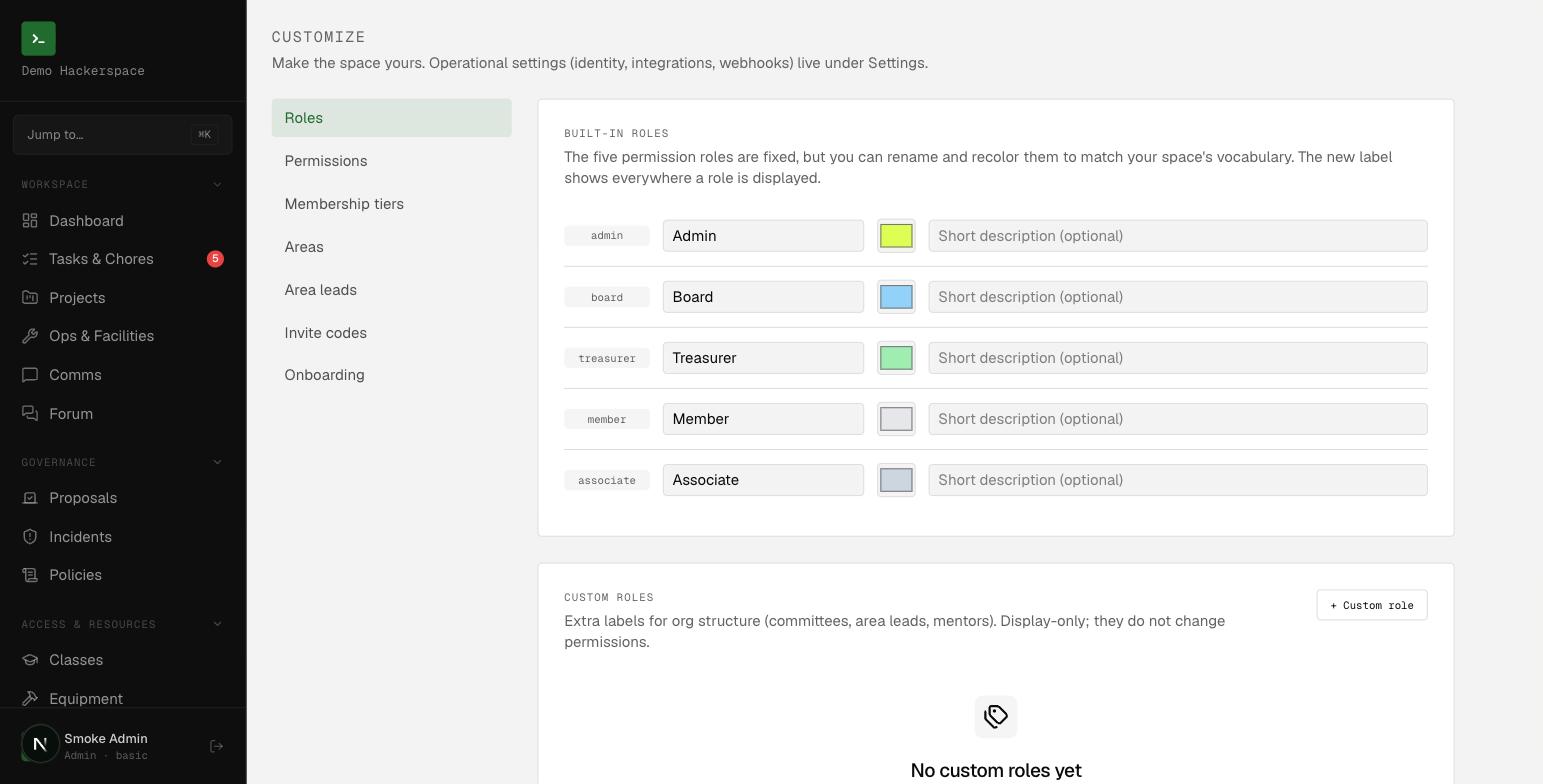 The Customize screen: panels down the left, the built-in roles ready to rename and recolor.
Before you start
You need the board or admin role to open /customize at all. Most panels let board members read the current configuration, but the changes that alter authorization (editing the permission matrix, creating roles, changing tiers, assigning area leads) are admin-only. When you are a board member, those controls render as view-only.
Open /customize and use the left-hand nav to move between panels: Roles, Permissions, Membership tiers, Areas, Area leads, Invite codes, and Onboarding. This page covers the first five.
Rename and recolor the built-in roles
The five roles (admin, board, treasurer, member, associate) are fixed and drive every permission check. You cannot add or remove them, but you can change how they are displayed everywhere in the app.
- Go to the Roles panel.
- Under Built-in roles, each row shows the fixed role code, an editable display name, a badge color, and an optional short description.
- Edit the name, pick a color, or type a description. Each field saves when it loses focus (on blur); you do not submit a form.
The new label appears anywhere the role is shown. The underlying role code never changes, so permissions and RLS are unaffected.
Add a custom role
Custom roles are extra labels for org structure, committees, mentors, working groups. They are display-only and do not grant any permissions on their own. (They can, however, appear as subjects in the permission matrix; see below.)
- In the Roles panel, under Custom roles, choose + Custom role (admin only).
- Enter a
slug(lowercase, kebab/underscore), a display name, a color, and an optional description. - Choose Create. Existing rows are edited in place on blur, and Delete removes a role permanently.
Edit the permission matrix
The Permissions panel is a grid: capabilities down the side, role subjects across the top. Checking a box grants that permission to that role for this space.
adminis never listed, it implicitly holds every permission and cannot be locked out.- Subjects are the built-in roles (except admin) plus any custom roles you created.
- Toggles save immediately per subject; a "..." indicator shows while saving, and a failed save reverts.
Permissions are additive. A grant only widens what a role can do through the surfaces that consult permissions; it never overrides the database tenant isolation (RLS) that keeps spaces separate. The available capabilities include, among others:
| Code | What it allows |
|---|---|
members.manage | Manage members |
payments.manage | Manage payments |
governance.manage | Manage proposals, incidents, policies |
ops.kb.write | Write knowledge base |
ops.secrets.read | Reveal secrets |
classes.instruct | Run classes: attendance, completion |
door.operate | Open/lock doors, push/revoke cards |
customize.manage | Customize roles, tiers, areas, invites, onboarding |
The full catalog is grouped by area (Ops, People, Finance, Governance, Community, Certifications, Classes, Equipment, Access, Admin) in the panel itself.
Define membership tiers
Every space is seeded with three built-in tiers: Plus, Basic, and Associate. Tiers set the plans a member can be placed on (see members).
- Go to the Membership tiers panel.
- Choose + New tier, then set a
slug, display name, price in USD, and a billing cadence:monthly,quarterly,annual,one_time, orcustom. - Choose Create tier. For any tier, edit the price inline (saves on blur).
Built-in tiers are marked built-in and can be archived (hidden) but not deleted. Custom tiers can be deleted outright.
Set up areas and area leads
Areas tag tasks, projects, and knowledge base entries by shop space. New spaces come seeded with areas like woodshop, electronics, laser, and 3d-printing.
To manage areas:
- Open the Areas panel and choose + New area.
- Enter a
code, a display name, and an optional emoji icon. - Reorder with the sort-order field, Archive to hide an area from pickers without losing history, or Delete to remove it.
To manage area leads:
- Open the Area leads panel. Each row is an area-lead role; unfilled roles show as Vacant.
- Choose + Area-lead role, give it an area code and a role name (e.g.
woodshop/ "Woodshop Lead"). - Use the per-row dropdown to assign a current member, or set it back to Vacant to unassign.
The assigned member effectively holds that area-lead role, so any Ops item whose access list includes it becomes available to them. You can also assign leads from the member directory.
Related
- Invite codes and Onboarding, the remaining Customize panels.
- Members, where roles and tiers are applied to people.